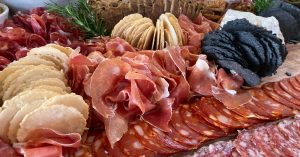
A meat platter isn’t just about feeding a crowd. It’s about creating something that makes people stop and take notice. Whether it’s a casual get-together, a birthday braai, or a formal dinner, meat platters offer a simple way to impress without fuss. They’re flexible, they travel well, and they hit the mark with most guests.
The idea is to create a mix of cold, sliced meats that are served together on a single board or plate. Some people go all out with charcuterie-style arrangements, while others prefer a simpler mix of cooked and cured meats. Either way, the platter becomes a centrepiece, not just a filler.
You can pull together a platter using what you already have in the fridge, or you can go all-in with cuts from the butcher. It’s entirely up to you. What matters is how the parts come together — and that starts with knowing what those parts are.
Selecting the Right Meats
Getting the meat mix right is the backbone of the whole platter. You want variety, but not chaos. Think about texture first: a soft slice of ham, something chewy like biltong or salami, and maybe something cooked like roast beef or shredded chicken. You’re not just offering protein — you’re offering contrast.
Cured meats like prosciutto, coppa, or chorizo bring salt and depth. Cold cuts such as pastrami or turkey slices add familiarity and volume. Smoked options, especially ones with fat and char, add flavour that stands out with very little effort.
You’ve also got to keep your guests in mind. If someone’s not into pork, swap in beef or poultry alternatives. Add vegetarian-friendly items if needed — not as a replacement, but as part of the offering. The point isn’t to please everyone with every slice — it’s to create a mix that gives people options without needing to explain anything.
Choosing Complementary Accompaniments
Once the meats are sorted, the extras help turn the board into a complete offering. Cheese is a classic. You want something sharp, something creamy, and something in-between. Don’t overthink it — cheddar, brie, and a crumbly blue can take you a long way.
Fruits bring freshness. Grapes, apple slices, figs, and berries all work. Dried fruits like apricots and dates add chew and sweetness. A few pickles or olives help to reset the palate and keep the board from becoming one-note.
Nuts add crunch, especially when lightly salted. Breadsticks, seeded crackers, or toasted slices of baguette create structure — people need something to carry the meats. And then there’s the spread: mustards, chutneys, relishes, or even a bit of honey. Don’t overdo it. One or two options are plenty.
Keep it balanced. The extras shouldn’t compete with the meat — they should make each bite more interesting.
Arranging the Platter for Visual Appeal
Now it’s time to put everything together — and this is where the magic happens. You want to build a platter that catches the eye before it hits the tongue. Start with your biggest items first, usually the meats. Fan them out. Stack them loosely. Give them shape. It’s okay if it looks a bit messy — that’s what makes it inviting.
Use colour to break up the space. Red salami next to green olives. Pale cheese near darker cuts. Add small bursts of colour with fruit. You want the eye to travel across the board and stop at different points.
Layering helps a lot. Stack meats in little rolls or piles. Tuck slices of cheese between them. Drop in fruits and nuts to fill gaps. Leave some white space — don’t overload every inch. Let people see what’s what.
And use garnish, but use it properly. Fresh herbs like rosemary or thyme can give the whole platter a lift. Just don’t use garnish that doesn’t make sense. If it’s not edible or doesn’t smell like it belongs, skip it.
Portion Planning and Serving Sizes
Getting the amount right saves you from awkward shortages or unnecessary waste. If the platter is a starter, 75 to 100 grams of meat per person is more than enough. If it’s the main feature, you’re looking at 150 to 200 grams per head.
But the trick is not just the weight. It’s how that meat is sliced and placed. Thin slices feel like more. A mix of small and large pieces lets guests build their own bites. Always have a bit extra just in case someone’s got a big appetite.
If you’re worried about leftovers, plan your meats with repurposing in mind. Cold roast beef can become a sandwich. Extra biltong works in pasta or salads. Think about how to reuse without reheating.
For balance, don’t overpack the platter. It’s better to refill as needed than to leave guests staring at something overwhelming and half-eaten.
Maintaining Freshness and Safety
You don’t want a platter that sits in the sun and starts to sweat. Always store your meats in the fridge until just before serving. If you’re setting up outdoors or for a longer event, use boards that can handle cold packs underneath.
Meat should be cool, not icy. Room temperature is fine for short stints, but anything over 30 minutes in the heat becomes a risk. Especially with soft cheeses or fatty cuts.
Use clean hands or gloves when handling the food. Don’t mix raw and cooked items unless they were stored together safely. Keep meat away from direct contact with porous bread or crackers unless they’ll be eaten immediately.
Once served, cover the platter loosely with cling wrap or mesh if flies are a problem. Replace items as needed — don’t just top up old pieces. That’s how things go off without you noticing.
Incorporating Regional and Seasonal Elements
Using local options brings in flavour that feels right for the occasion. If you’re in the Cape, you might lean into biltong, snoek, or local cheeses. Up north, you could bring in game meats, or droëwors. Every region has something worth showcasing.
Seasonal changes also matter. In summer, fresh fruits like melon, mango, or grapes bring brightness. In winter, nuts, preserves, and root vegetables offer more comfort.
Try to pick meats that suit the weather. Something heavy like roast lamb might work in cooler months, while smoked chicken or cold beef works better in the heat. You don’t need to change everything — just adjust the details to match the setting.
Cultural considerations help too. Know who’s coming and what they’re likely to enjoy. It doesn’t mean you have to cater to every possible preference — it just means being aware of what might not go down well in a mixed group.
Budgeting and Cost-Effective Choices
You don’t have to spend a fortune to make a platter look expensive. Shop smart. Get bulk cuts from the butcher and slice them yourself. Pre-packaged meats are convenient but often come with a price tag that adds up fast.
Go for a mix of premium and everyday items. Pair a nice cut of cured meat with more affordable cold roast slices. Add in some vegetarian extras to bulk it out.
Cheese can be a wallet killer if you’re not careful. Instead of buying five expensive types, choose one good cheese and fill the rest with spreads, nuts, and fruit.
Skip branded sauces. A homemade chutney or local relish often does the job for less. Even butter with herbs or flavoured oils can add something different without costing extra.
And always check local markets. You’ll often find better deals and fresher options than you would in major supermarkets.
Final Touches for a Memorable Presentation
The last step is how you serve it. The board or platter itself sets the tone. Wooden boards look rustic and feel warm. Slate feels sharp and modern. White plates make the colours stand out.
Try not to overdecorate. A well-arranged platter doesn’t need flowers or twinkling lights. But labels help. A small piece of paper next to each meat or cheese gives guests the freedom to choose without guessing.
Serving utensils matter. Use proper tongs or forks. Don’t expect guests to pick at slices with their fingers, even if it’s casual. If the event calls for it, include side plates and napkins. Make it easy for people to eat without asking for extras.
Set up the platter near where people gather — not stuck in a corner. It should be part of the action. The goal is to create something that gets noticed, then emptied, then talked about — without needing to say a word.


Leave a Reply